On Ebay...
Here!
Friday, August 19, 2011


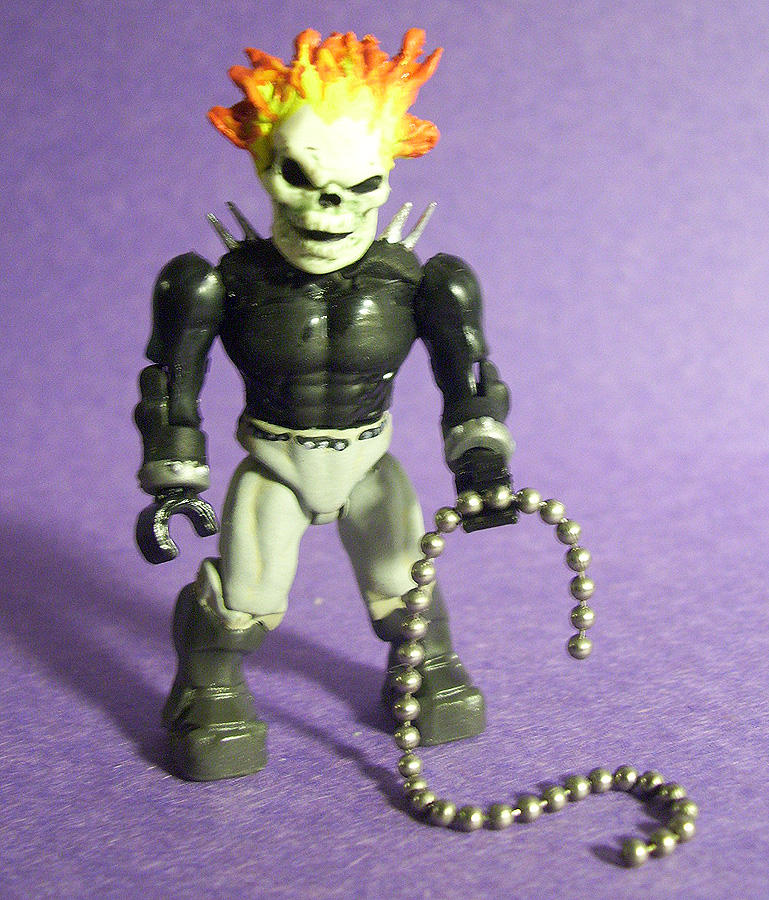
Ghost Rider custom Mega Bloks figure
Archive of past customs:
http://www.brickshelf.com/cgi-bin/gallery.cgi?f=449194 HALO FIGURES
http://www.brickshelf.com/cgi-bin/gallery.cgi?f=472881 OTHER FIGURES
http://www.brickshelf.com/cgi-bin/gallery.cgi?f=410182 STAR WARS FIGURES
Mega Bloks Customizing - Painting
I've seen lots of folks (beginners) try to hand paint a base color. This turns out blobby and icky. I recommend if you can afford it to buy a can of $3 black flat spray paint from a hardware store. Spray the fig just enough to cover it, not 'blobby' or heavy. Wait overnight to dry. Then hand paint your secondary color (purple). Leave some crevaces and joints black to allow the 2 tone to work. Also, try to follow the lines of the armor to keep your edges straight.
You pay more for less of the hobby brands paints.
I started w/ enamel paints, they are nice because 1 coat will do the job. But you cant mix them easily for new colors. Acrylic is what i use now, can get bigger bottles for less, then mix colors easily, and cleans easy.
NOW: Read this, GamesWorkshop book on painting 101, and even new stuff for a more advanced painter. Caution: Large file to download (but well worth it if you are interested in painting).
Mega Bloks Customizing - Sanding
Generally sanding is not necessary for a repaint. If your paint isn't sticking wash the bare fig in soapy water to remove plastic oils.
I have seen some great sanding to increase joint movement.
1. sand a notch in the back of the head near the joint hole to allow head to move upward more.
2. sand back of calves for better squat position
3. sand inside of elbow to allow tighter squeeze of arm while bent.
Of course same thing applies for elites, just in different ways.
Lego Customizing Tips - Clone Helmet Smoothing
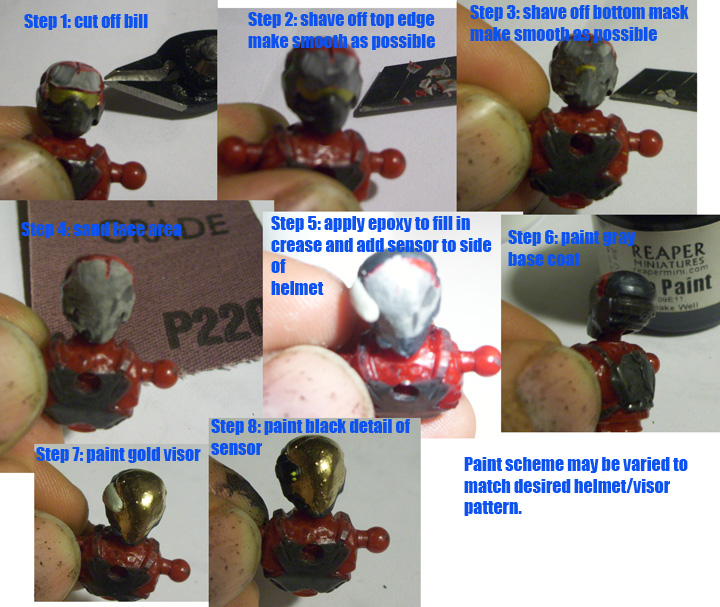
There are a few tricks to getting the helmet just right. If done well, it may be painted and used to simulate mandalorian style helmets (Boba, Jango Fett etc.). Here is my procedure...
1. At craft store buy 'flush' clippers. These look like wire cutters but cut nice and flush to surface ($7).
2. Clip off fin using above clippers. If you don't want to purchase clippers use wire snips.
2a. If use #2 method: use exacto blade and carefully trim more of the fin off. Work from the side to the middle. NOT from the end, if you work from the end you will leave low spots.
3. Now you are ready for some rough sand paper, 120 grit or so. Sand down.
4. Finish with a superfine sand paper, finer the better, 200 grit or so. This is a MUST, or the helmet will look wounded and scarred.
5. Next you may paint, use a stand made of old Lego's. Don't use an old head in the helmet, just use an old 1x1 round. This will allow the helmet to be taken off with ease.
6. I like to use 'Fusion' spray paint. This is a nice paint.
7. Now for the face mask. Hand paint is one option, or you can make a water slide decal. I use a printer/plotter to print and cut commercial grade vinyl. Don't know of anyone else that does it that way, but it works nicely.
Buy my figs! They are one of a kind, and high quality! Have fun chopping up your Lego's to make your own super cool Clone Troopers!
Lego Customizing Tips - Painting
I grew up painting 1/72 army men, yes the 1/2 inch tall ones. This lent to a love of painting tiny things! Here are a couple painting tips:
I usually use enamel paints, they adhere well to the plastic. Although I am moving toward acrylic simply because you can mix them together easier and make shades and new colors. Any time you are painting on plastic, it should be sealed with some kind of clear spray. Do it lightly or it will run. Fingernail polish that is clear does not work well in my opinion, it makes the paint run if it is not 100% bone dry.
Another tip for painting, get small brushes. Lego is small, so have a range of sizes of brushes.
When I wore out all my small brushes I did 2 things. 1. snip off stray hairs on the brush to extend life. 2. save one medium size brush that is hard and scraggly and use it to paint random scratches or camo. To do this, barely touch the ends in paint, wipe some excess off (less the better) then touch or drag on surface for scratches/dents/dirt effect depending on the color.
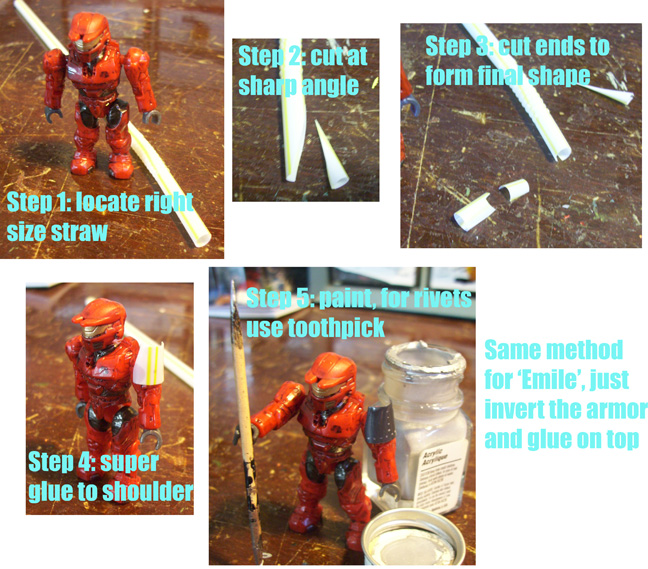
When you just don't have a tiny brush worth a darn, use a toothpick to make Lego size rivets. Put these on shields, helmets, etc.
I usually use enamel paints, they adhere well to the plastic. Although I am moving toward acrylic simply because you can mix them together easier and make shades and new colors. Any time you are painting on plastic, it should be sealed with some kind of clear spray. Do it lightly or it will run. Fingernail polish that is clear does not work well in my opinion, it makes the paint run if it is not 100% bone dry.
Another tip for painting, get small brushes. Lego is small, so have a range of sizes of brushes.
When I wore out all my small brushes I did 2 things. 1. snip off stray hairs on the brush to extend life. 2. save one medium size brush that is hard and scraggly and use it to paint random scratches or camo. To do this, barely touch the ends in paint, wipe some excess off (less the better) then touch or drag on surface for scratches/dents/dirt effect depending on the color.
When you just don't have a tiny brush worth a darn, use a toothpick to make Lego size rivets. Put these on shields, helmets, etc.
Lego Customizing Tips - Graphics
I love graphic design, what a fun way to combine math and creativity. I use Adobe Illustrator to design decals. You can find the template for minifig size decals at the Minifig Customization network webpage or Google 'minifig template'. This is a starting point. Place this jpg into AI. Then trace over the jpg to create lines you can edit. I use layers in AI so that the cut line used by the plotter (die cut machine) is on a separate layer, and won't be moved while editing the graphic layer.
If you are just printing on sticker paper and cutting by hand, you want to design just to the size you want to cut out. If you use a plotter, design so that there is some extra detail outside of the area to be cut so that if the plotter is out of register slightly, you don't have a nasty white line show up.
You can find lists of Lego colors converted to CMYK values online. This is a start, every printer is different so they may need to be adjusted.
As far as design goes, the sky is the limit. Begin by finding other Lego designs you like and copy them, make changes and go from there. When you have advanced - take a real image and attempt to design it in Lego graphics. This is tricky. Sometimes I make a sketch on paper first.
The more designs you make the easier it becomes, not only do your skills improve but you begin to build a library of elements to pull from. For example: designing Aurra Sing I liked the belt from the Cobra soldier, then pulled the shirt from Padme, then the back from a Jango, added and tweaked a few things and wallah! Couldn't be easier.
Subscribe to:
Posts (Atom)